
In today’s tutorial, we unveil an exciting addition to the world of Proteus simulations—the Infrared Sensor Library for Proteus. This new IR sensor is a breakthrough, especially for those engaged in Embedded Systems Projects, particularly in robotics and automation. Join me as we delve into the intricacies of this library, designed exclusively for Proteus.
Understanding Infrared Sensors
Types and Applications
Before we proceed, let’s briefly understand the types of Infrared Sensors available in the market. Some modules feature separate transmitter and receiver chips, triggered by light interruptions (See the below table for this). This library, however, integrates both components on a single chip. This innovation allows the IR signal to transmit, bounce back upon encountering an obstacle, and be received by the IR sensor.
| Type | Applications |
|---|---|
| Separate Transmitter and Receiver Modules | Commonly used for light interruption detection in various applications. |
| Integrated Transmitter and Receiver on a Single Chip | Designed for efficient obstacle detection, ideal for robotics and automation projects. |
| Long-Range Infrared Sensors | Suitable for applications requiring detection over extended distances, such as security systems. |
| Short-Range Infrared Proximity Sensors | Perfect for close-range object detection, often used in touchless interfaces. |
| Multi-Channel Infrared Sensors | Offering the capability to detect multiple sources simultaneously, suitable for advanced applications. |
Benefits of Infrared Sensor
| Benefits | Details |
|---|---|
| Efficient Obstacle Detection | The integrated design allows for effective detection of obstacles in front of the sensor. |
| Compact Single-Chip Design | The sensor’s single-chip configuration enhances simplicity and ease of integration into projects. |
| Versatility | Adaptable to various applications, from robotics to automation, due to its versatile functionality. |
| Simulation Capability | Designed for seamless integration with Proteus software, facilitating realistic simulations. |
| Easy Integration with Microcontrollers | Future tutorials will guide users on interfacing the sensor with popular Microcontrollers like Arduino and PIC. |
Infrared Sensor Pin Configuration
| Pin | Description |
|---|---|
| Vcc | Provide +5V to this pin. |
| GND | Ground this pin. |
| OUT | Output pin; goes HIGH when an obstacle is detected and remains LOW in normal conditions. |
| TestPin | Used in Proteus simulation; LOW indicates normal conditions, HIGH simulates the presence of an obstacle. |
How to Use the Infrared Sensor Library for Proteus
Video Tutorial: Installation Made Easy
Worried about the installation process? Check out our video tutorial guiding you through the library installation and usage.
We understand the importance of visual aids, and our tutorial ensures a smooth experience for users of all levels.
Downloading and Installation
To kickstart the process, download the Library files by clicking the button below. Upon extraction, you’ll find three crucial files: InfraredSensorsTEP.IDX, InfraredSensorsTEP.LIB, and InfraredSensorsTEP.HEX.
Library Placement
Move these files to the Library folder of your Proteus software. If you’re using Proteus 8, refer to our guide on adding new libraries in Proteus 8 Professional.
Software Restart
Once the files are in place, restart your Proteus software. In the components section, search for “Infrared Sensor.”
Circuit Integration and Simulation
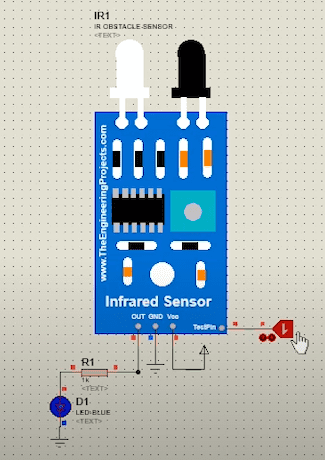
Now, let’s dive into the practical aspect. Place the IR Obstacle Sensor in your Proteus workspace. If all goes well, you’ll witness a simulated output that mirrors real-world scenarios.
Understanding Pins
As shown in the simulation, the Infrared sensor has four pins: Vcc, GND, OUT, and TestPin. Learn how to provide the necessary power, ground the sensor, and interpret output from the TestPin.
Properties Panel Configuration
To maximize the functionality of the Infrared Sensor, configure its Properties Panel by selecting the InfraredSensorsTEP.HEX file.
Simulation Results
As you run your Proteus simulation, observe the results. When the TestPin is LOW, the OUT Pin remains LOW, signifying no obstacle. Conversely, a HIGH TestPin indicates the presence of an obstacle.
Conclusion
In conclusion, the Infrared Sensor Library for Proteus adds a powerful tool to your engineering arsenal. We hope this guide assists you in seamlessly integrating and utilizing this library. Feel free to reach out with suggestions and stay tuned for more engaging tutorials. Take care and have fun engineering!
Read More
Frequently Asked Questions (FAQs)
- Where can I find the Infrared Sensor Library for Proteus on GitHub?
- You can easily access the Infrared Sensor Library for Proteus on GitHub by visiting the official repository. Additionally, you can visit this website for the Infrared Sensor Library: goalmdcat.com/infrared-sensor-library/.
- Is the Infrared Sensor Library for Proteus available for free download?
- Yes, the library is available for free download, ensuring that all Proteus users can easily obtain and use it. For direct download, visit goalmdcat.com/infrared-sensor-library/.
- Can I use the Infrared Sensor Library for Proteus with Arduino?
- Absolutely! The library is fully compatible with Arduino, offering seamless integration for a wide range of projects.
- How do I download the Infrared Sensor Library for Proteus?
- Downloading the Infrared Sensor Library for Proteus is a breeze. Simply visit our official website and click the download button at goalmdcat.com/infrared-sensor-library/.
- What is the best Infrared Sensor Library for Proteus?
- The library provided on our website is widely considered one of the best, offering reliable performance for your Proteus simulations.
- Where can I download the IR Sensor Library for Proteus 8?
- You can find the download link for the IR Sensor Library compatible with Proteus 8 on our official website at goalmdcat.com/infrared-sensor-library/.
- Is there a proximity sensor library for Proteus available for download?
- Certainly! You can easily download the proximity sensor library for Proteus from our website at goalmdcat.com/infrared-sensor-library/.
- How can I get the IR sensor in Proteus?
- Follow our step-by-step guide available on our website to smoothly incorporate the IR sensor into your Proteus simulations. Visit goalmdcat.com/infrared-sensor-library/ for more details.
the output of the IR sensor is zero showing in my simulation. i am usin proteus 8.15. i have tried in 8.12, 8.13, 8.17 also but the result iss same. please tell me what to do??
What its mean. You just simulate the IR sensor through the test Pin.