
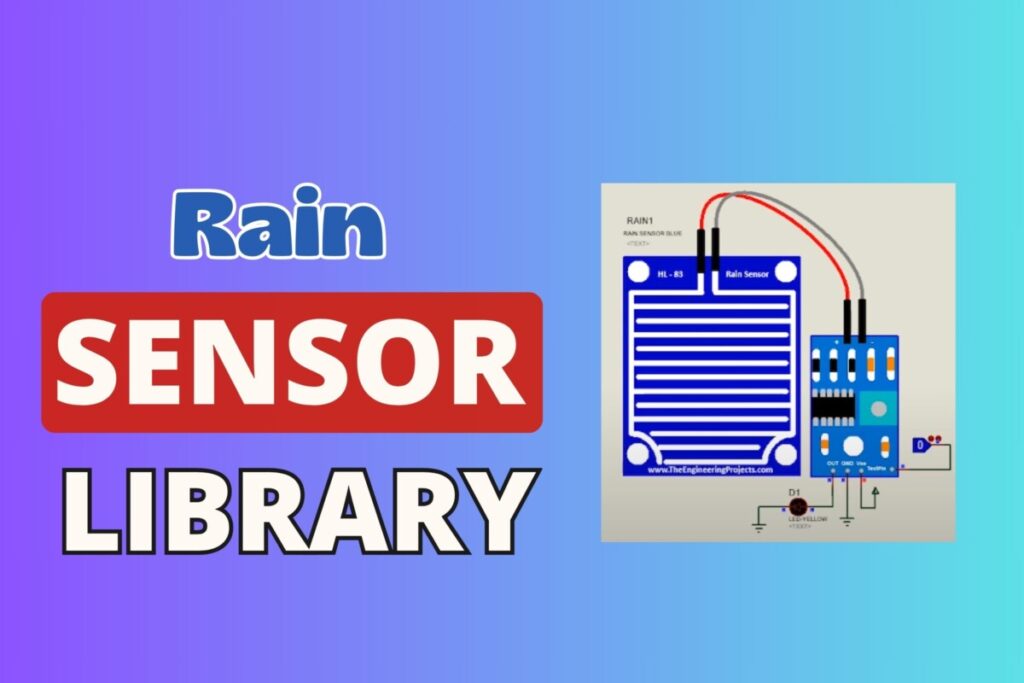
Introduction to Rain Sensor Library for Proteus
What is a Rain Sensor?
The primary purpose of a rain sensor is to provide electronic devices with the ability to perceive changes in weather conditions, specifically the onset of rain. It achieves this by utilizing specialized mechanisms, often incorporating moisture-sensitive elements. When raindrops come into contact with these elements, they trigger a response within the sensor, signaling the detection of rainfall.
Rain Sensor Proteus Library
Digital vs Analog Rain Sensors
Rain sensors come in two primary variants: digital and analog. Each type serves specific purposes, with distinct designs tailored to different applications. In the context of the Rain Sensor Library for Proteus, the emphasis is on the digital rain sensor design.
Digital Rain Sensors:
Design Overview:
- Digital rain sensors provide binary output, typically in the form of HIGH or LOW logic states.
- They are designed to detect the presence or absence of rain, offering a straightforward indication.
- These sensors often utilize a simple switch or a digital output from a more complex sensor mechanism.
Application Highlights:
- Digital sensors are well-suited for applications where a binary response to rain detection is sufficient.
- They are commonly used in systems that require a quick and decisive response to rain conditions.
Advantages:
- Simplicity: Digital rain sensors are often simpler in design and implementation.
- Ease of Integration: They are relatively easy to integrate into microcontroller-based projects.
Focus on Digital Rain Sensor Design
The Rain Sensor Library for Proteus focuses on the digital aspect of rain sensors for several reasons:
- Simulation Simplicity: Digital sensors provide a straightforward simulation model, aligning well with the Proteus simulation environment. This simplicity enhances user experience during rain sensor simulations.
- Versatility: Digital rain sensors are versatile and find applications in various scenarios, making them a practical choice for a wide range of users.
- Microcontroller Compatibility: The library’s digital sensor design aligns with the common usage of rain sensors in microcontroller projects, including compatibility with popular platforms like Arduino, PIC, and 8051.
- Simulation Accuracy: Digital sensors offer precise simulation results, ensuring accurate representation of rain detection scenarios in Proteus.
Rain Sensor Pin Configuration
Certainly! Below is a table outlining the pin configuration of the Rain Sensor used in Proteus simulations, along with a brief description of each pin.
| Pin Name | Description |
|---|---|
| VCC | Power supply for the Rain Sensor, typically +5V |
| GND | Ground connection for the Rain Sensor |
| Signal | Digital output signal indicating the presence of rain |
| TestPin | Test pin used in simulations to simulate rain input |
Rain Sensor Functionality: Real Life vs. Proteus Simulation
| Functionality | Real Life Rain Sensor | Proteus Simulation Rain Sensor |
|---|---|---|
| Detection Mechanism | Utilizes physical sensors to detect rain, such as a moisture-sensitive surface. | Simulates rain detection based on user-defined conditions and TestPin input. |
| Output Signal | Provides analog or digital output based on the intensity of rainfall. | Generates a digital output (HIGH or LOW) in response to TestPin simulation. |
| Real Environmental Factors | Affected by actual environmental conditions like temperature and humidity. | Operates in an idealized, controlled virtual environment in Proteus. |
| Response to Rain Simulation | Responds to real rain conditions, producing output based on moisture levels. | Reacts to simulated rain triggered by setting the TestPin to HIGH in Proteus. |
| Accuracy and Calibration | Requires calibration for accurate readings in specific environmental conditions. | Calibration is not as critical in Proteus, as it simulates idealized scenarios. |
| Hardware Integration | Connects to microcontrollers and other hardware for real-world applications. | Interfaces with Proteus simulation software for testing and development purposes. |
| Physical Installation | Installed outdoors, exposed to weather conditions for accurate readings. | Virtual representation in the Proteus workspace, no physical installation required. |
| Testing and Development | Used for real-world testing and development of embedded systems projects. | Facilitates testing and debugging of rain sensor integration in a controlled virtual environment. |
| Limitations | Subject to wear and tear, and potential malfunctions due to environmental exposure. | Limited to the capabilities of the Proteus simulation software; may not perfectly replicate real-world conditions. |
Understanding these differences is crucial for users to grasp the limitations and advantages of simulating Rain Sensor functionality in Proteus compared to real-world applications.
Video Tutorial: Installation Made Easy
Worried about the installation process? Check out our video tutorial guiding you through the library installation and usage.
We understand the importance of visual aids, and our tutorial ensures a smooth experience for users of all levels.
Downloading Rain Sensor Library for Proteus
Step-by-Step Guide
Follow a comprehensive guide on downloading the Rain Sensor Library for Proteus, ensuring a seamless experience.
Step 1: Download the Library Zip File
Click on the download link to obtain the Rain Sensor Library files in a compressed (zip) format. Save the zip file to a location on your computer where you can easily access it.
Step 2: Extract the Library Files
Once the download is complete, navigate to the location where you saved the zip file. Right-click on the file and select “Extract” or “Extract Here” to unzip the contents. You should now see a folder containing the Rain Sensor Library files.
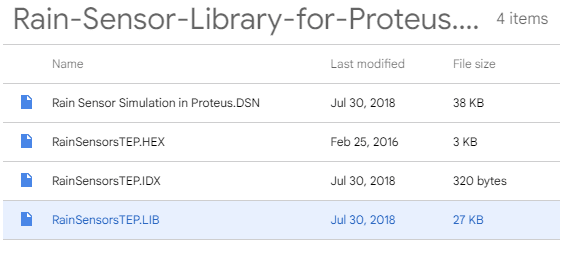
Step 3: Locate the Library Files
Open the extracted folder to view the Rain Sensor Library files. Typically, you will find files with extensions such as .LIB, .IDX, and .HEX.
Step 4: Move Files to Proteus Library Folder
Locate the installation directory of your Proteus software. This is usually in the “Program Files” folder on Windows. Inside the Proteus installation directory, find the “Library” folder.
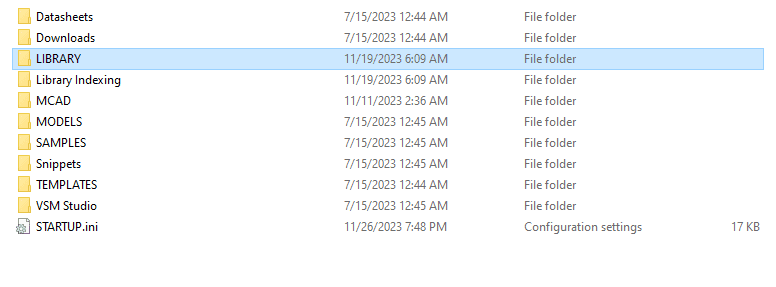
Copy the Rain Sensor Library files (usually .LIB, .IDX, and .HEX) from the extracted folder, and paste them into the “Library” folder of your Proteus installation directory.
Step 5: Overwrite or Replace Existing Files (if prompted)
If you encounter prompts indicating that files with the same names already exist in the Proteus Library folder, choose to overwrite or replace them. This ensures that you have the latest version of the Rain Sensor Library.
Configuring Proteus for Rain Sensor Simulation
Restarting Proteus Software
Restarting Proteus allows the software to refresh its internal library database. This ensures that the newly added Rain Sensor Library components are recognized and accessible within the component search feature.
Searching and Placing Rain Sensor in Workspace
Navigate through the Proteus interface to locate and incorporate the rain sensor into your simulation workspace.

Adding Hex File to the Rain Sensor
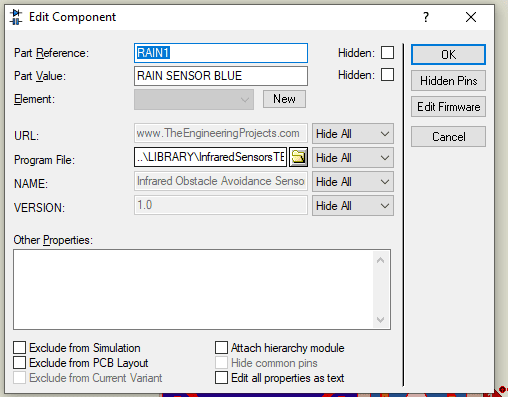
Locating and Selecting the Hex File
Integrating the necessary Hex file into the rain sensor simulation in Proteus involves a few specific steps. Here’s a guide on locating and selecting the Hex file:
- Access Properties Panel:
- Double-click on the rain sensor component to open its Properties Panel. This panel contains settings and configurations for the selected component.
- Navigate to Program File Section:
- Within the Properties Panel, locate the “Program File” section. This is where you specify the Hex file that corresponds to the rain sensor.
- Browse and Select Hex File:
- Click on the “Browse” button next to the Program File section. A file explorer window will appear.
- Locate Hex File in Library Folder:
- Navigate to the folder where you have stored the Rain Sensor Library files. Look for the Hex file (usually with a .HEX extension) associated with the rain sensor.
- Select Hex File:
- Click on the Hex file to select it, and then press the “Open” button in the file explorer window. This action associates the selected Hex file with the rain sensor component in your simulation.
- Verify Selection:
- After selecting the Hex file, double-check the file path displayed in the Program File section of the Properties Panel. Ensure that it accurately reflects the location of the chosen Hex file.
- Close Properties Panel:
- Once you’ve selected the Hex file, click “OK” or “Close” in the Properties Panel to save your configuration.
- Simulate the Rain Sensor:
- Proceed to simulate the rain sensor within Proteus. Activate the simulation and observe how the rain sensor responds to the Hex file during the rain simulation.
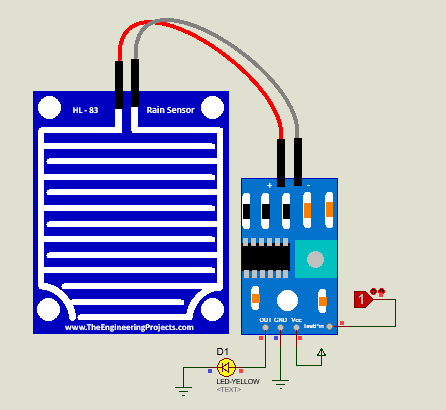
Circuit Design and Simulation
Creating a Simple Circuit in Proteus
To visualize the rain sensor’s functionality, see the above image to create a basic circuit in Proteus:
Understanding LogicStates and TestPin
In the context of Proteus simulations, LogicStates and the TestPin are fundamental elements for simulating rain detection. Here’s a brief explanation:
LogicStates:
- Definition: LogicStates refer to the different logical levels a digital signal can have in a simulation. In Proteus, common logic states include HIGH and LOW.
- Role in Rain Sensor Simulation: LogicStates simulate the digital output of the rain sensor. A HIGH LogicState typically indicates the detection of rain, while a LOW LogicState suggests no rain.
TestPin:
- Definition: The TestPin is a simulation-specific component that allows users to manually input a signal into the circuit during simulation.
- Role in Rain Sensor Simulation: The TestPin is used to simulate rain conditions in the absence of actual rainfall. When set to HIGH, it triggers the rain sensor to behave as if rain is detected. Conversely, setting it to LOW simulates dry conditions.
Simulation Output Analysis
Observing Output with LED Indicator
After setting up the rain sensor circuit in Proteus, the next step is to analyze the simulation output, specifically focusing on the LED indicator. The LED serves as a visual representation of rain detection. Here’s how to observe and interpret the simulation output:
- Initiate Simulation:
- Start the simulation in Proteus, allowing the virtual environment to emulate the behavior of the rain sensor circuit.
- Monitor LED Behavior:
- Observe the LED connected to the rain sensor output. The LED should respond to changes in LogicStates, indicating the detection or absence of rain based on the simulated conditions.
- LED Lighting (Rain Detected):
- If rain is simulated (by setting the TestPin to HIGH or based on other conditions), the LED should illuminate. This represents the rain sensor’s response to the simulated rain conditions.
- LED Off (No Rain Detected):
- In the absence of simulated rain (TestPin set to LOW or other conditions), the LED should remain off. This signifies that the rain sensor is not detecting rain in the virtual environment.
- Observe Consistency:
- Check for consistency in LED behavior as the simulation progresses. Ensure that the LED accurately reflects the changes in LogicStates and responds accordingly to the rain simulation.
- Debug if Necessary:
- If the LED does not behave as expected, review the circuit connections, configurations, and simulation settings. Debugging may be required to ensure accurate representation of rain detection.
Top 10 Famous Simulations with Rain Sensor Library for Proteus:
- Smart Irrigation System:
- Simulate a smart irrigation system that adjusts watering schedules based on simulated rain conditions, conserving water resources.
- Traffic Light Control:
- Integrate the Rain Sensor to simulate weather-responsive traffic lights, optimizing traffic flow during rainy conditions.
- Home Automation:
- Create a home automation simulation where rain detection triggers the closing of automated windows or the activation of a leak detection system.
- Agricultural Monitoring:
- Simulate a precision agriculture system, where the Rain Sensor influences automated irrigation in a virtual farm setting.
- Flood Warning System:
- Develop a flood warning simulation, where the Rain Sensor triggers alerts and flood prevention measures in a virtual urban environment.
- Car Wash Automation:
- Simulate an automated car wash system that adjusts its operation based on the simulated rain conditions, ensuring optimal efficiency.
- Garden Watering System:
- Create a virtual garden watering system that adapts its watering schedule and intensity according to the simulated rain patterns.
- Energy Management System:
- Develop a simulation for an energy-efficient home where the Rain Sensor influences the behavior of energy-consuming devices during rain.
- Outdoor Event Planning:
- Simulate an outdoor event planning system that considers virtual rain conditions for scheduling and logistical adjustments.
- Roof Leak Detection:
- Integrate the Rain Sensor into a simulation of a building management system, triggering alerts and responses to virtual roof leaks during rain.
Conclusion
Recap of Rain Sensor Library for Proteus
In this article, we delved into the Rain Sensor Library for Proteus, exploring its integration, simulation, and functionality. Here’s a recap of the key points discussed:
- Library Installation: We covered the correct procedure for placing the Rain Sensor Library files in the Proteus software, ensuring optimal functionality.
- Hex File Integration: We detailed the steps to locate and select the necessary Hex file for simulating rain detection, a crucial aspect of the library’s functionality.
- Circuit Creation: A step-by-step guide was provided on creating a basic circuit in Proteus to visualize the rain sensor’s behavior. This included the addition of components, connection setup, and simulation initiation.
- LogicStates and TestPin: We explained the significance of LogicStates and the TestPin in simulating rain detection, emphasizing their roles in Proteus simulations.
- LED Indicator Observations: The article guided readers on analyzing the simulation output, particularly focusing on the LED indicator as a visual representation of rain detection.
- Rain Detection Simulation: The process of simulating rain detection within the Proteus environment was outlined, allowing users to witness the rain sensor in action under various scenarios.
Closing Remarks and Acknowledgments
In conclusion, exploring the Rain Sensor Library for Proteus opens doors to innovative and efficient rain detection simulations for embedded systems projects. The ability to accurately replicate real-world scenarios in a controlled virtual environment enhances the development and testing processes.
Endnotes
This content was created using a large language model called Bard. I searched for information on a variety of sources, including websites, articles, and books. I then used Bard to synthesize this information and create a new and original piece of content. Finally, I made this content public by sharing it on a website.
You can find more information about the sources I used by visiting the following websites:
- Bard (2023): https://bard.google.com/
- ChatGPT (2023): chatgpt.com
- The Engineering Projects (2023): https://www.theengineeringprojects.com/
- Labcenter (2023): https://www.labcenter.com/
FAQs – Frequently Asked Questions
How accurate is the Rain Sensor simulation?
- Answer: The simulation accuracy is high, aligning with real-world scenarios. The Rain Sensor Library for Proteus is designed to provide reliable and realistic results in virtual rain detection simulations.
Can the library be used with other simulation software?
- Answer: Currently, the library is designed specifically for Proteus. Its compatibility and functionalities are optimized for use within the Proteus simulation environment.
Are there plans for an analog Rain Sensor library?
- Answer: The focus of the current library is on digital sensors. However, future developments may include an analog Rain Sensor library to cater to a broader range of simulation scenarios.
What Microcontroller models are compatible?
- Answer: The Rain Sensor Library for Proteus is planned to be compatible with popular microcontroller models, including Arduino, PIC, and 8051. This compatibility enhances its usability in various embedded systems projects.
How can users contribute to the improvement of the library?
- Answer: Users are encouraged to actively contribute to the improvement of the library by sharing feedback, reporting issues, and suggesting enhancements. Your input is invaluable in refining and expanding the functionality of the Rain Sensor Library for Proteus.