
Greeting and gratitude: Hi there! Thanks for stopping by. Today, we’re delving into the fascinating world of Arduino boards, specifically exploring the Arduino Mega 1280 Library for Proteus.
Overview of the post: We’ll cover the differences between Arduino Mega 1280 and Mega 2560, the power options for Arduino boards, and a step-by-step guide on downloading, Install and incorporating the Arduino Mega 1280 Library.
Exploring Arduino Mega 2560 Library for Proteus
In a previous post, we delved into the Arduino Mega 2560 Library for Proteus. Today, our focus shifts to its counterpart, the Arduino Mega 1280, exploring the subtle differences in flash memory and microcontrollers.
Pin Configuration Table of the Arduino Mega 1280
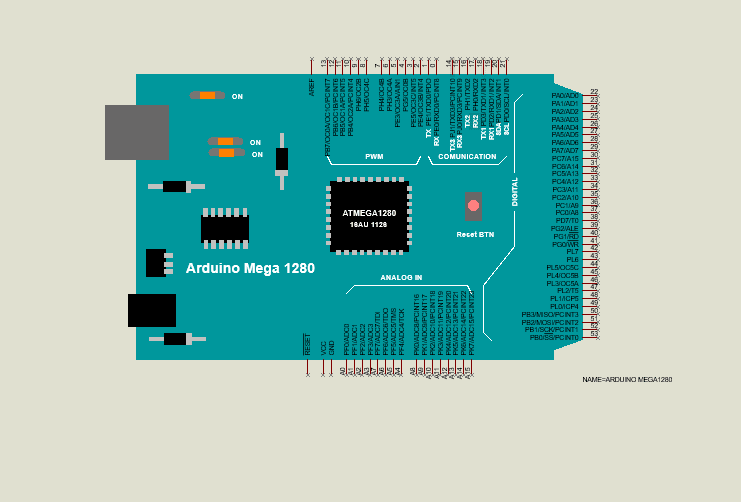
Here’s a table detailing the pin configuration of the Arduino Mega 1280 along with a brief description of each pin:
| Pin Number | Pin Name | Description |
|---|---|---|
| 1 | RX0 | Serial communication receive (UART) |
| 2 | TX0 | Serial communication transmit (UART) |
| 3 | INT0 | External interrupt 0 |
| 4 | INT1 | External interrupt 1 |
| 5 | INT2 | External interrupt 2 |
| 6 | INT3 | External interrupt 3 |
| 7 | INT4 | External interrupt 4 |
| 8 | INT5 | External interrupt 5 |
| 9 | INT6 | External interrupt 6 |
| 10 | INT7 | External interrupt 7 |
| 11 | VCC | Power supply voltage (5V) |
| 12 | GND | Ground |
| 13 | XTAL1 | Crystal oscillator input |
| 14 | XTAL2 | Crystal oscillator output |
| 15 | AREF | Analog reference voltage input (for ADC) |
| 16 | RESET | Resets the microcontroller |
| 17-24 | A0-A7 | Analog input channels for ADC |
| 25-32 | 22-29 | Digital I/O pins (22 to 29) |
| 33-40 | 30-37 | Digital I/O pins (30 to 37) |
| 41-48 | 38-45 | Digital I/O pins (38 to 45) |
| 49-53 | 46-50 | Digital I/O pins (46 to 50) |
| 54 | SDA | I2C data line |
| 55 | SCL | I2C clock line |
| 56 | IOREF | Voltage reference for I/O pins (usually 5V) |
| 57 | GND | Ground |
| 58 | RESET | Reset button (connects to the reset pin) |
| 59 | 5V | Power supply voltage (5V) |
| 60 | GND | Ground |
| 61-69 | A8-A15 | Analog input channels for ADC |
| 70-77 | 51-38 | Digital I/O pins (51 to 38) |
| 78-85 | 37-30 | Digital I/O pins (37 to 30) |
| 86-93 | 29-22 | Digital I/O pins (29 to 22) |
| 94-97 | 21-18 | Digital I/O pins (21 to 18) |
| 98-101 | 17-14 | Digital I/O pins (17 to 14) |
| 102 | 13 | Digital I/O pin (with PWM) |
| 103 | 12 | Digital I/O pin (with PWM) |
| 104 | 11 | Digital I/O pin (with PWM) |
| 105 | 10 | Digital I/O pin (with PWM) |
| 106 | 9 | Digital I/O pin (with PWM) |
| 107 | 8 | Digital I/O pin (with PWM) |
| 108 | 7 | Digital I/O pin (with PWM) |
| 109 | 6 | Digital I/O pin (with PWM) |
| 110 | 5 | Digital I/O pin (with PWM) |
| 111 | 4 | Digital I/O pin (with PWM) |
| 112 | 3 | Digital I/O pin (with PWM) |
| 113 | 2 | Digital I/O pin (with PWM) |
| 114 | 1 | Digital I/O pin (with PWM) |
| 115 | 0 | Digital I/O pin (with PWM) |
This table provides a comprehensive overview of the pin configuration of the Arduino Mega 1280, including its various digital and analog pins.
Differentiating Arduino Mega 2560 and Arduino Mega 1280
While both boards share similar functionalities, the Mega 2560 boasts a larger flash memory of 256kb, compared to the Mega 1280’s 128kb.
let’s create a difference table between the Arduino Mega 2560 and Mega 1280:
| Feature | Arduino Mega 2560 | Arduino Mega 1280 |
|---|---|---|
| Microcontroller | Atmega 2560 | Atmega 1280 |
| Flash Memory | 256kb | 128kb |
| USB Connectivity | Yes | Yes |
| Digital I/O Pins | 54 | 54 |
| Analog Input Pins | 16 | 16 |
| Operating Voltage | 5V | 5V |
| PWM Pins | 15 | 14 |
| UART | 4 | 4 |
| Clock Speed | 16MHz | 16MHz |
This table highlights the key differences between the Arduino Mega 2560 and Mega 1280, including the microcontroller used, flash memory size, and various other specifications.
Installing Arduino Mega 1280 Library for Proteus
Step-by-Step Guide
1. Download the Library
Click on the provided link to download the Arduino Mega 1280 Library for Proteus. Upon download, you’ll find a zip file containing two essential files: ArduinoMegaTEP.LIB and ArduinoMegaTEP.IDX.
2. Extract and Organize
Extract the zip file and locate the two files. Copy and paste them into the library folder of your Proteus software.
3. Integration into Proteus
Restart your Proteus software and click the ‘P’ button. Look for ‘Arduino Mega 1280’ in the options. Select it, and your cursor will indicate its availability for placement in the Proteus workspace.
4. HEX File Inclusion
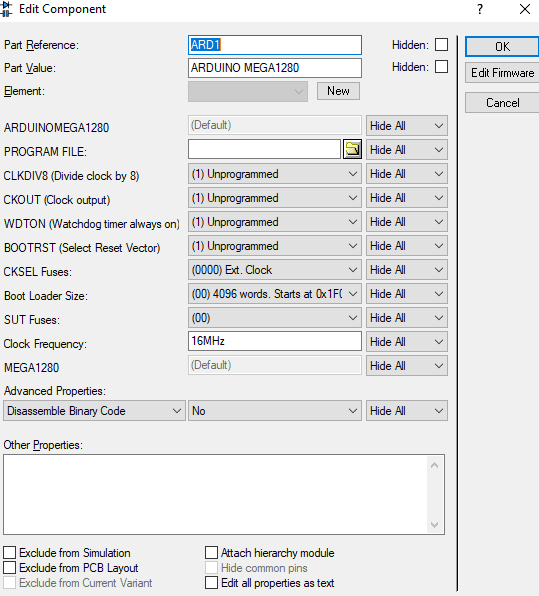
To run the board effectively, include the HEX file. Right-click or double-click the board, go to ‘edit properties,’ and browse the ‘PROGRAM FILE’ option to upload the HEX file.
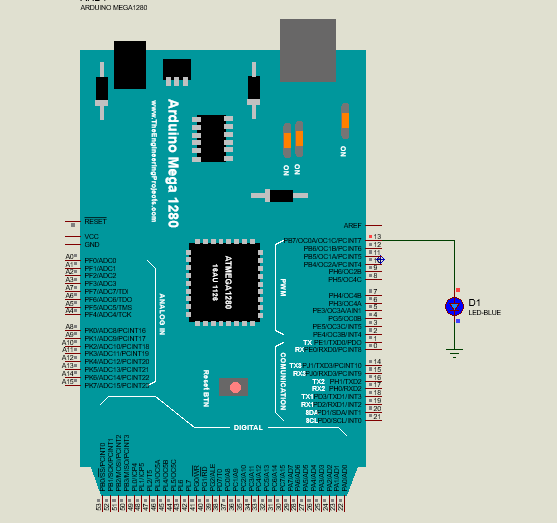
Building a Simple LED Blinking Circuit
With the library in place, let’s construct a basic LED blinking circuit using the Arduino Mega 1280 in the Proteus workspace.
1. Circuit Design
Design a circuit where an LED is attached to pin 13 of the Arduino Mega 1280.
2. Code Execution
Open the blink example in the Arduino software, upload the HEX file, and run the Proteus software to visualize the LED blinking.
Conclusion:
In conclusion, the Arduino Mega 1280 Library for Proteus opens up a world of possibilities for electronic enthusiasts. The seamless integration of hardware and software, coupled with a user-friendly interface, makes it an invaluable tool for both beginners and seasoned developers.
Endnotes
This content was created using a large language model called Bard. I searched for information on a variety of sources, including websites, articles, and books. I then used Bard to synthesize this information and create a new and original piece of content. Finally, I made this content public by sharing it on a website.
You can find more information about the sources I used by visiting the following websites:
- Bard (2023): https://bard.google.com/
- ChatGPT (2023): chatgpt.com
- The Engineering Projects (2023): https://www.theengineeringprojects.com/
- Labcenter (2023): https://www.labcenter.com/
Frequently Asked Questions
- What is the primary difference between Arduino Mega 2560 and Mega 1280?
- The key difference lies in the flash memory, with Mega 2560 having 256kb and Mega 1280 having 128kb.
- How can I download and install Proteus software?
- Refer to our detailed guide on downloading and installing Proteus for a step-by-step process.
- Why is the Arduino Mega 1280 Library essential for Proteus?
- It enhances educational experiences by allowing students to understand Arduino board functionalities within the Proteus workspace.
- Can I power Arduino Mega boards with an external source?
- Yes, both USB cables and external power sources like AC-to-DC adapters or batteries can power these boards.
- Is Proteus simulation necessary for Arduino projects?
- Proteus simulation provides a virtual environment to test and visualize Arduino projects, making it a valuable tool for developers.