
Hey Today, let’s dive into the Arduino Nano. This tutorial will guide you through the process of downloading, installing, and simulating the Arduino Nano board in proteus.
Unveiling Arduino Nano
What is Arduino Nano?
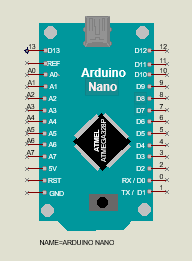
Arduino Nano, crafted by Arduino.cc, is a compact, powerful Microcontroller board based on ATmega328p/Atmega168. Similar in functionality to the Arduino Uno but smaller, it boasts 14 digital I/O pins, 8 analog pins, 2 reset pins, and 6 power pins. With a 16MHz crystal oscillator frequency and a handy mini USB port, this board is a versatile tool for your electronic projects.
Table 1: Arduino Nano Pin Configuration
| Pin Number | Function | Description |
|---|---|---|
| 1 | D13 / SCK | Digital pin 13, Serial Clock for SPI communication |
| 2 | D12 / MISO | Digital pin 12, Master-In-Slave-Out for SPI |
| 3 | D11 / MOSI | Digital pin 11, Master-Out-Slave-In for SPI |
| 4 | D10 / SS | Digital pin 10, Slave Select for SPI communication |
| 5 | D9 | Digital pin 9, general-purpose I/O |
| 6 | D8 | Digital pin 8, general-purpose I/O |
| 7 | D7 | Digital pin 7, general-purpose I/O |
| 8 | D6 | Digital pin 6, general-purpose I/O |
| 9 | D5 | Digital pin 5, general-purpose I/O |
| 10 | D4 | Digital pin 4, general-purpose I/O |
| 11 | D3 / RX | Digital pin 3, Receive for serial communication |
| 12 | D2 / TX | Digital pin 2, Transmit for serial communication |
| 13 | A0 | Analog pin 0 for analog input |
| 14 | A1 | Analog pin 1 for analog input |
| 15 | A2 | Analog pin 2 for analog input |
| 16 | A3 | Analog pin 3 for analog input |
| 17 | A4 / SDA | Analog pin 4, Serial Data Line for I2C communication |
| 18 | A5 / SCL | Analog pin 5, Serial Clock Line for I2C communication |
| 19 | A6 | Analog pin 6 for analog input |
| 20 | A7 | Analog pin 7 for analog input |
| 21 | RST | Reset pin |
| 22 | 5V | Power Supply (5 Volts) |
| 23 | 3.3V | Power Supply (3.3 Volts) |
| 24 | GND | Ground |
Table 2: Benefits of Arduino Nano Over Other Arduino Types
| Feature | Arduino Nano | Other Arduino Types |
|---|---|---|
| Size | Compact and small | Varied sizes depending on the model |
| Power | 5V and 3.3V power supply options | Different models may have different power options |
| I/O Pins | 14 digital, 8 analog | Number of pins varies across different models |
| USB Connectivity | Mini USB port for code transfer | USB Type-B or micro USB ports |
| Crystal Oscillator Frequency | 16MHz | Frequency may vary |
| Reset Pin | Dedicated RST pin for reset | Reset options may differ |
| Board Comparison | Compact and powerful compared to predecessors | Features may differ based on the specific model |
| Library Compatibility | Optimized , backward compatibility possible | Compatibility may vary with different libraries |
| Simulation in Proteus | Proteus simulation support | Simulation support depends on the specific model |
| Versatility | Breadboard-friendly and versatile | Versatility varies with different Arduino models |
Arduino Nano Library for Proteus
Enhancing the Simulation Experience
Let’s take a step-by-step journey into install the Arduino Nano Library for Proteus into your simulation environment.
Library Download:
Begin by downloading the Arduino Nano Library for Proteus. Click the button below to grab the zip file.
Extract and Organize
Unzip the downloaded file to reveal the “Proteus Library Files” folder. Inside, find two essential files: ArduinoNano2TEP.dll and ArduinoNano2TEP.idx.

Library Integration
Copy these files and seamlessly place them in the Library folder of your Proteus software.
Library Selection
Open or restart Proteus and navigate to the “Pick from Libraries” button. Look for Arduino Nano in the list and select it.
Board Placement
Drag and drop the Arduino Nano board onto the Proteus workspace.
Hex File Upload
Double-click the Arduino Nano board, and a properties panel will appear. Click “Upload Hex File” and choose your Arduino code’s hex file.

Simulation Success
Observe the successful placement of the Arduino Nano board in the Proteus workspace, ready for simulation.
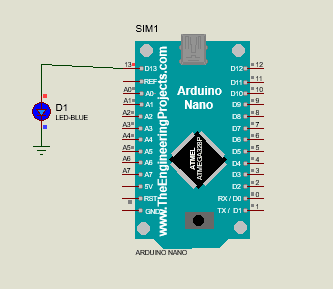
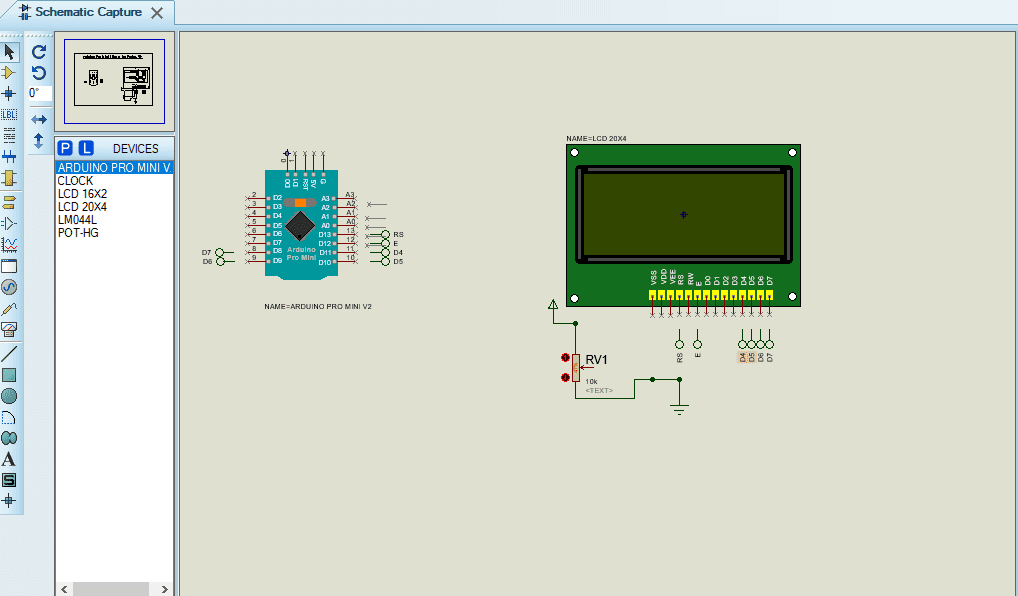
Crafting a Simulation: Arduino Nano LCD Interfacing
Taking Your Simulation Skills to the Next Level
- Simulation Essentials
While the provided simulation is sufficient, it’s beneficial to design your own. Let’s take a step further and interface a 20×4 LCD with the Arduino Nano board. - Circuit Connection
Connect the data pins of the LCD to Arduino Nano pins 8, 9, 10, and 11. Attach Arduino pins 12 and 13 to the Enable and reset of the LCD. - Code Compilation
Compile the Arduino code from the provided zip file to obtain the hex file needed for simulation. - Hex File Upload, Again
Utilize the Arduino Nano properties panel to upload the newly acquired hex file, following the steps we covered earlier. - Simulation Results
Click the RUN button and witness the successful interface of the LCD with the Arduino Nano board.
Wrapping Up the Arduino Adventure
Your Journey Concludes
- Summary of Steps
To recap, you’ve downloaded the Arduino Nano Library, integrated it into Proteus, placed the board, uploaded the hex file, and successfully simulated LCD interfacing. - Closing Thoughts
That’s a wrap for today’s tutorial. I hope you’ve found this article insightful and engaging. If you have any questions or need assistance, drop your queries in the comments below. Your feedback is invaluable in shaping our content to meet your needs. Stay tuned for more Arduino adventures. Happy tinkering!
Endnotes
This content was created using a large language model called Bard. I searched for information on a variety of sources, including websites, articles, and books. I then used Bard to synthesize this information and create a new and original piece of content. Finally, I made this content public by sharing it on a website.
You can find more information about the sources I used by visiting the following websites:
- Bard (2023): https://bard.google.com/
- ChatGPT (2023): chatgpt.com
- The Engineering Projects (2023): https://www.theengineeringprojects.com/
- Labcenter (2023): https://www.labcenter.com/
Frequently Asked Questions
Q1: Where can I download the Arduino Nano Library for Proteus?
A1: You can download the library by clicking the provided link in the article.
Q2: Can I use the library for the older Arduino Nano version?
A2: The library is optimized for the new Nano version but may be compatible with the older version.
Q3: Are there other Proteus libraries available for Arduino boards?
A3: Yes, and stay tuned as more libraries for different Arduino boards in the future.
Q4: How can I contribute or suggest topics for future tutorials?
A4: We welcome your suggestions and contributions. Feel free to share your ideas in the comments or contact us directly.